- About this manual
- Login
- Menu
-
File list
- File list
- Upload files
-
File Distribution
- About Email text
- About security settings
- Send from own mailer
- Email to Receiving (collecting) and distribution
- About Email text of the Email to collect and distribute
- About security settings of the Email to collect files and distribute files
- Notification of file and collection Email send from own mailer
- Check on how many people the file was sent
- Group sharing folder function
- Folder publication
- Display thumbnail image function
- Receive (collect)
- Mail standby
- Address book
- Approval list(※Option)
- History
- Settings
- Profile
- Support
- Help
- Download files
- Upload files
File List
File Distribution
Email to receiving (collecting) and distribution
This is a function to receive files from someone and at the same time distribute files him/her with one Email.
You can send Email to up to 10 address and send up to 10 files with one operation. (It is able to change another setting administrator have set)
It is possible to set the security setting on every time you send files and collect files. According to your need, you can set security-function freely. It provides you to high security. This function is available when you can send Email to inform the file distribution and file collecting.
Please press the [distribute] button on the right of the file you want send. You will move to “Notification of registered file” page. Please press [The notification of file and collection Email send] button.
![[The notification of file and collection Email send]button](../../help-images/view-en/4-3-4_1.gif)
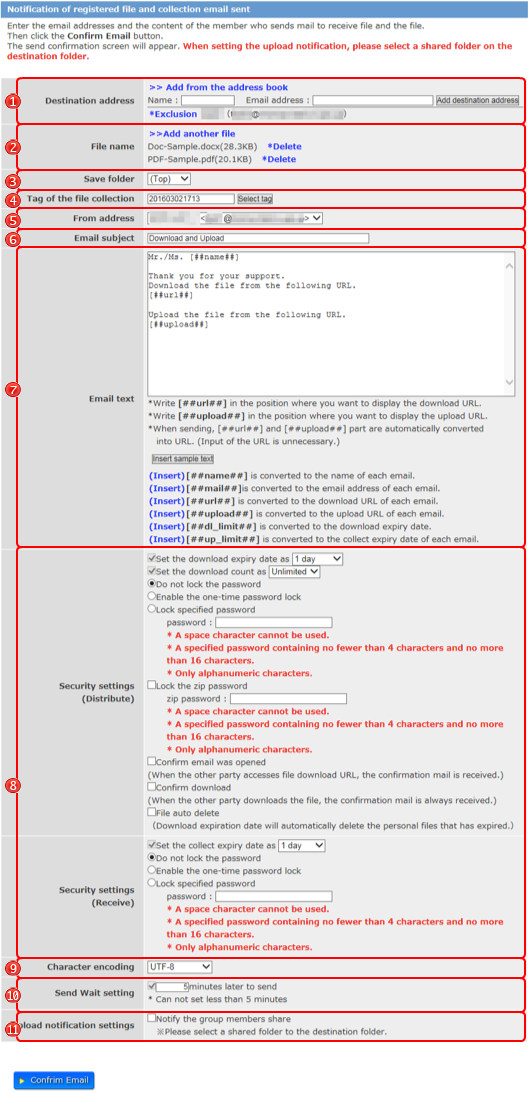
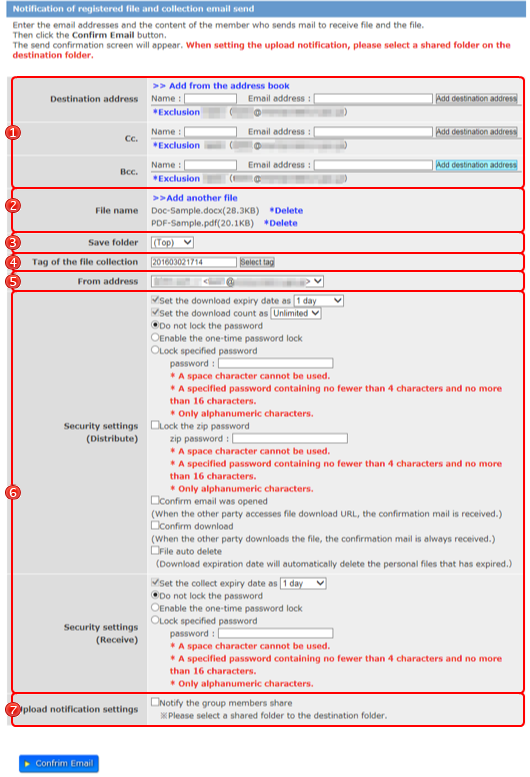
Please enter and select the items, and set security-settings as your need.
 address address |
Enter an address or choose from the address book. You can set up to 10 addresses. (It is able to change another setting administrator have set) Please enter the address and click [Add destination address] button. Or click “Add from the address book” and choose address from it. If you need to delete addresses you chose, please click “*Exclusion”.   On the window of select from the address book, please click the address you want to add or check the check-box, and click [↓] button.  After check on the address, please click [Add Destination address] button. These addresses are add to the file distribution area. If you enter the address that is not on the address book, you are able to add it to your address book after you send this Email. (It will be registered as “Non group”. If you need divide into group, you can change the group of address. (→change group of address) If a mail address is inputted when the mail address is registered into the address book, it will come to be indicated by prediction from an address book. When clicking a mail address to input, the mail address clicked in the input area of the address is displayed. 
|
|---|---|
 File name File name |
This is a file will be sent. You can send up to 10 files at once. (It is able to change to the administrator has set.) If you send another files with the same time, please click “Add another file” and add files. If you want to delete files you select, please click the “Delete” on the right hand.  Select files you want to send. Please select the folder which has files you want to add. When you select the folder, files in that folder are displayed. Please select the file you want to add. After you select the file and click the [↓] button, files you select is displayed in the added files below the browser.  If you want to delete the file that in the added files, please click the [Delete] at the right hand of the file name. When you click the [ Add another file ], you can add more files. 
|
 Save folder Save folder |
When the “appoint save folder function“ is available, you can select the save folder. Beforehand, you can appoint the folder in which file will be uploaded. In case you appoint the folder, a file you collect will be uploaded directly in the folder not in the file list. |
 Tag of the file Tag of the file collection |
With the tags, you can manage your Email to collect files. If some tags are already set, you can see the tag list with press the [select tag] button. When you want use the tag already set, please click the tag name link and the name will be set into the text box. If you want to set a new tag, please enter the name into the text box. |
 From address From address |
According to the usage, you can send email of file notification with another sender name and sender email address. You can register another sender name and email address in the sender settings(→Sender setting). When the sender setting is invalid, the From address is not displayed. |
 Email subject Email subject |
Title of the Email. |
 Email text Email text |
Text of the Email. Please enter necessary items. (→About Email text of the Email to collect and distribute) |
 security settings security settings |
Security setting for the notification file sending and file collecting. Please set security function according to your need. (→About security settings of the Email to collect files and distribute files) |
 Character encoding Character encoding |
You can set up character encoding of e-mail. You can choose either for ISO-2022-JP or UTF-8. |
 Send Wait setting Send Wait setting |
An item is displayed when a transmission standby function is effective. Even if a transmission standby function distributes a file, it will be in a standby state, and it is a function made to be unable to perform download of a file for a while. When time is set up beforehand, standby is performed in time set up. 
When a setup of transmission standby is possible, you can choose use and can do transmission standby.And time can be set up. Time lower than an initial value cannot be set up. 
|
 Upload Uploadnotification settings |
It is a setup which can be used when having chosen the shared folder by the storage place folder. When a file uploads, the selected share member is notified of what the file uploaded. Selection of "Notify the group members share " will display an "Notify all member of the shared group" or "Select a member" radio button.  If you select "Notify all member of the shared group", make the notification to all members. If you select "Select a members", will be displayed "Select a member " link.  When clicking a link, a member selection screen is displayed.Please choose the member who notifies and click a [Add Destination address] button.  When adding a member, the member name chosen as the notice setup of upload is displayed.Please click "exclusion" link, when you delete a member.It is deleted from a notice member. 
|
All what you entered is correct, please click [Confirm Email] button.
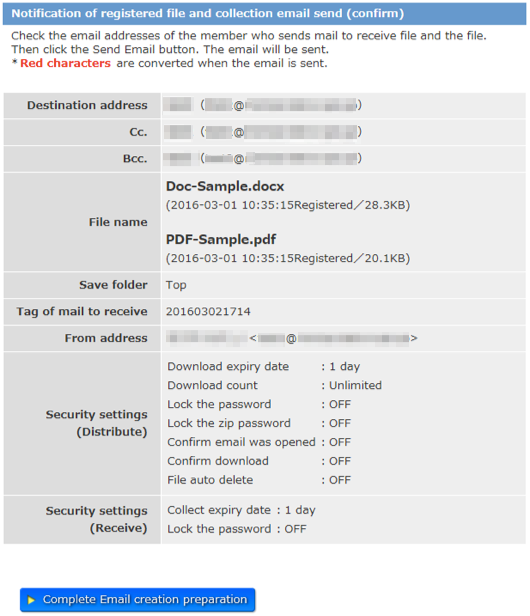
You move to the” Notification of registered file and collection Email send (confirm)” page. On this page, In case administrator set a superior (*Option), there is a area you have to select your superior from, so please select. Your operation to send files to someone is notified to your superior by Email. After your superior agrees with your operation, the Email is sent. If the superior does not agree, the Email does not be sent (→Approval list(※Option))
.
After check on items you entered or selected, please click [Send Email] button.
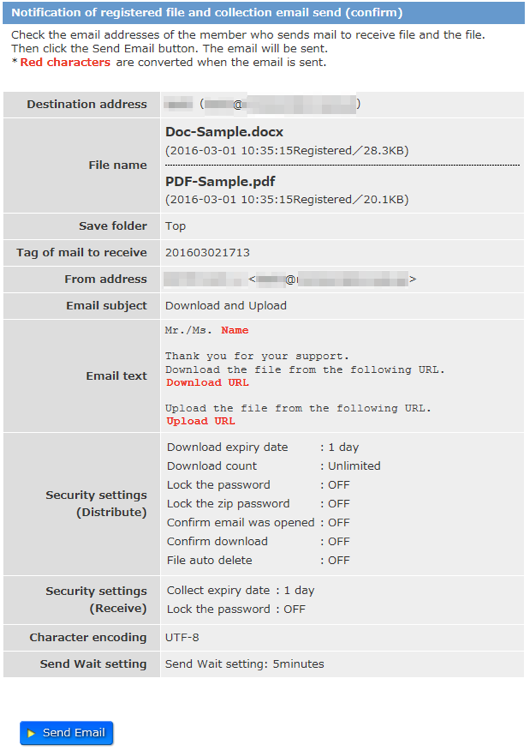
Page of notification of registered file (completed) will appear. The notification Email was sent and file distribution was completed.

About Email text of the Email to collect and distribute
You can write Email text with transformation characters more easily. Transformation characters will be change into download-URL to distribute files, upload-URL to collect files, the term of validity, names that Emails are sent to and addresses that Emails are sent to.
In addition, you can use function as follows. Function to enter the sample text to your Email text, create Email text template, and create your signature template.
| [Insert sample text] |
You can insert sample text the system prepared in advance into your Email. Please click [Insert sample text] button. | ||||||||||||
|---|---|---|---|---|---|---|---|---|---|---|---|---|---|
| Template |
You can select template text users prepared and insert it into your Email. If users do not create template, it does not appear.
|
||||||||||||
| Sign off |
You can select template signature you prepared and insert it into your Email. If you do not create signature, it does not appear.
|
||||||||||||
| Transformation characters |
Transformation characters are changed automatically into specific words when Email is sent. You click “Insert” on the left hand of each transformation characters, they are inserted into your Email text.
|
About security settings of the Email to collect files and distribute files
You can set security function every you send Email to collect files and distribute files. It is able to use by combination according to your need.
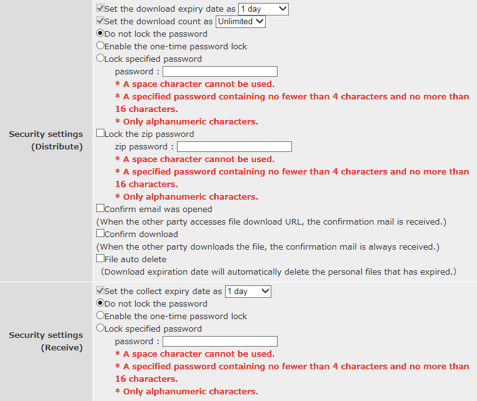
About security settings to distribute files
- Encryption by SSL
- the communication is encrypted by EV-SSL. This is a standard function.(※ This is appeared when connected by EV-SSL.)
- The download expiry date
- You can set the expiry date of download files with URL written in the Email.
After that count, it is impossible to download with the URL. - The download count
- You can set the upper limit of the frequency of downloads.
It is impossible to download using the URL more than the frequency. - Do not lock the password
- Do not use lock function.
- Enable the one-time password lock
- You can lock one-time password lock. The password is only use one time, and it is can be used by with Email address you limit, so it is very secure.
- Lock specified password
- You can lock with the word or number you decide. Please inform file-receiver the password.
- Zip password
- The file is compressed into the zip file. And, the password can be freely set.
- Confirm Email was opened
- After files are distributed, and a file-receiver access the download URL, a notification Email is sent to you.
- Confirm download
- After files are distributed, and files are downloaded, a notification Email is sent to you.
- File auto delete
- Download expiration date will automatically delete the files that has expired. Personal files is auto delete, but share files not done. It does not auto delete even if you set the download expiration date indefinitely.
About security settings to collect files
- The upload expiry date
- You can set the expiry date of upload files with URL written in the Email.
After that count, it is impossible to download with the URL. - Do not lock the password
- Do not use lock function.
- Enable the one-time password lock
- You can lock one-time password lock. The password is only use one time, and it is can be used by with Email address you limit, so it is very secure.
- Lock specified password
- You can lock password with the word or number you decide. Please inform file-receiver the password.
Notification of file and collection Email send from own mailer
This feature makes the receive (collect) files and distribution of files from own mailer.
It is able to send up to 10 files to 30 addresses in total at once. (10 addresses can be sent respectively of To, Cc, and Bcc.)
You can set security function every time. According to your need, you can set security function freely. It provides you to high security.
It is able to use if this function had been set on.
Please click [Distribute] button on the right of the file you want to send in the file list page.
Please click [Send email of the notification of file and collection from own mailer] button, then you will move to the page to send someone notification Email.
Please enter and select some items, and set security function as you need.
| Destination address, Cc. Bcc. |
Destination address, Cc, Bcc: enter the address or select from address book. You can set up to 10 addresses. If you want to add more addresses, please press [Add destination address] button. Or, you are able to add more addresses with using the address book. Please select the address you want to add and press [Add destination address] button on window of address book. If you want to delete the address in the To, Cc and Bcc, please click “* Exclusion”.  When you select the address you want file to send from the address book, on the window of address book, please click the address you want to add or check in the check-box beside the address.  Please click [↓] button, and the address will be added in the address area. Please certain the address and please press[Add destination address] button. So, the address add to. If a mail address is inputted when the mail address is registered into the address book, it will come to be indicated by prediction from an address book. When clicking a mail address to input, the mail address clicked in the input area of the address is displayed.
|
|---|---|
| File name |
This is a file you want send. You can send up to 10 files at once. To add more files,
please press “Add another file” and select the file from the list. If you want to delete the file name you selected, please click “Delete” on the right side of the file name. Please select the folder which has files you want to add. When you select the folder, files in that folder are displayed. Please select the file you want to add. After you select the file and click the [ ↓] button, files you select is displayed in the added files below the browser. If you want to delete the file that in the added files, please click the [Delete] at the right hand of the file name. When you click the [ Add another file ], you can add more files.
|
| Save folder |
When the “appoint save folder function“ is available, you can select the save folder. Beforehand, you can appoint the folder in which file will be uploaded. In case you appoint the folder, a file you collect will be uploaded directly in the folder not in the file list. |
| Tag of the file collection |
With the tags, you can manage your Email to collect files. If some tags are already set, you can see the tag list with press the [select tag] button. When you want use the tag already set, please click the tag name link and the name will be set into the text box. If you want to set a new tag, please enter the name into the text box. |
| From address |
According to the usage, you can send email of file notification with another sender name and sender email address. You can register another sender name and email address in the sender settings(→Sender setting). When the sender setting is invalid, the From address is not displayed. |
| security settings |
Security setting for the notification file sending and file collecting. Please set security function according to your need. (→About security settings of the Email to collect files and distribute files) |
| Upload notification settings |
It is a setup which can be used when having chosen the shared folder by the storage place folder. When a file uploads, the selected share member is notified of what the file uploaded. Selection of "Notify the group members share " will display an "Notify all member of the shared group" or "Select a member" radio button. If you select "Notify all member of the shared group", make the notification to all members. If you select "Select a members", will be displayed "Select a member " link. When clicking a link, a member selection screen is displayed.Please choose the member who notifies and click a [Add Destination address] button. When adding a member, the member name chosen as the notice setup of upload is displayed.Please click "exclusion" link, when you delete a member.It is deleted from a notice member.
|
All you entered is correct, please click [Confirm Email] button. You will move to the “Notification of registered file (confirm)” page.
The page is for the user sending file with their own mailer.
In case administrator set a superior (*Option), there is a area you have to select your superior from, so please select.
Your file will not be able to be downloaded from someone without the superior’s agreement with your operation.
Your operation is inform your superior by Email (→Approval list(※Option).)
All you entered and set are correct, please click [Complete Email Creation Preparation] button.
You move to the page of Notification of registered file and collection email send (completed). It has been completed to send an Email to send file with your own mailer software.
The URL to download files and the url to upload files are appear on this page.
Please copy this URL into your Email text, and send Email to the address you have set into To, Cc, Bcc.
To start your usual mailer software, please click [Start own mailer] button.